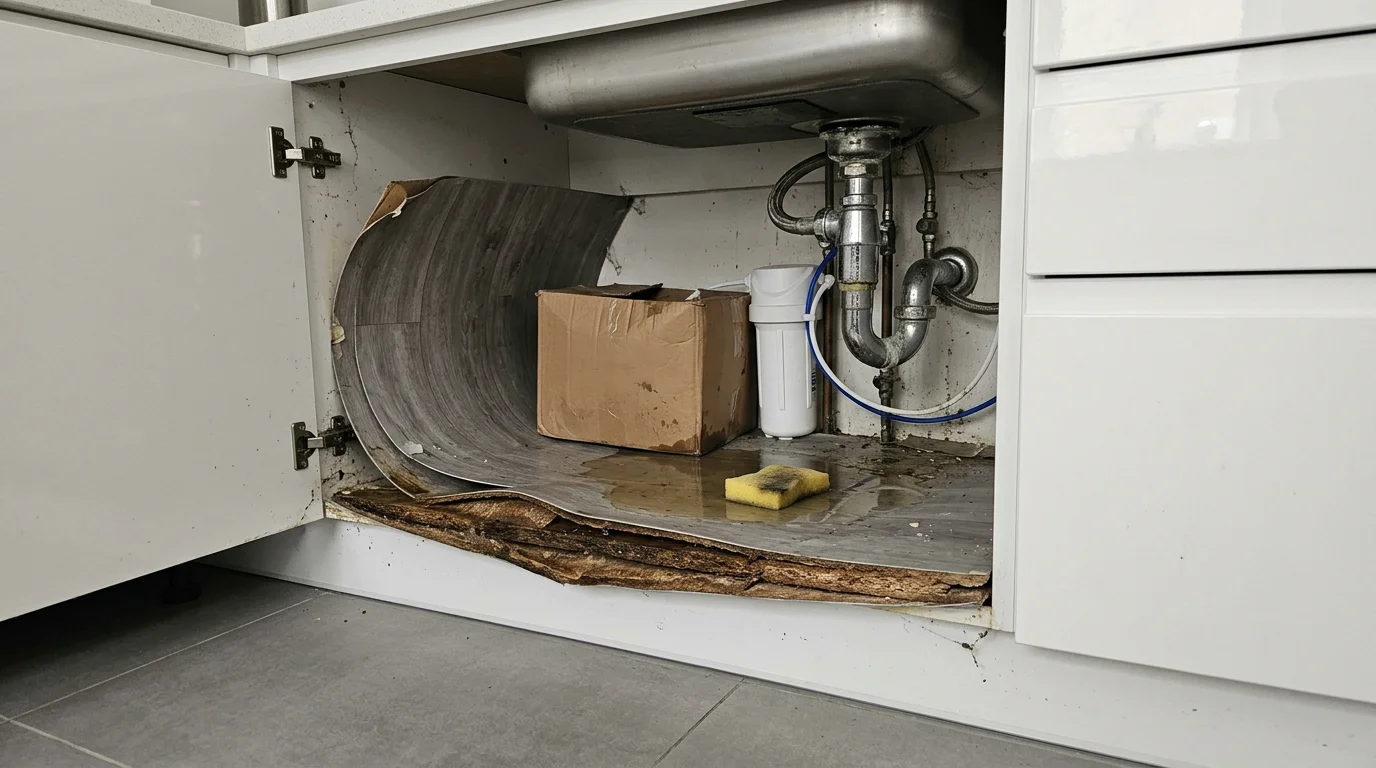
It is rarely the drip that tells you. It is the smell when you open the door for the detergent, a glass that no longer sits flat, the laminate lifting at the edge like a sticker peeling, or the discovery that the toe kick is soft when you lean against it.
By the time a kitchen cabinet shows water damage, the water has usually been arriving slowly, in small amounts, for weeks. And in a Dubai kitchen, that is worse than it sounds, because the air conditioning dries the surface of the panel while the core underneath stays wet.
Here is how to find where it is coming from in about ten minutes with nothing but paper towel, what damage can honestly be repaired, what never comes back, and the questions to ask before anyone starts cutting.
The first hour: stop, dry, document
Do these in this order. Not one of them is optional.
- Shut off the supply. Small isolation valves under the sink first. If they are seized or missing, use the property’s main stopcock rather than forcing a corroded valve and snapping it.
- Kill power near the water. If water has reached a socket, the disposal, the dishwasher outlet or an under-counter charger, switch that circuit off at the distribution board. Water on a worktop edge running down into a run of sockets is a genuine shock risk, not a theoretical one.
- Empty the cabinet and get the standing water out. Towels, then a wet vacuum if you have one. Pull the mats, the bins, the cardboard boxes. Storing anything absorbent in a base cabinet is how a small leak becomes a big one.
- Prop the doors open and move air. A fan pointing into the cavity does more than a room fan. In a Dubai kitchen the AC is already dehumidifying, so run it while you dry.
- Photograph everything before you touch it. Open doors, the swollen edge, the floor, the wall behind, with a timestamp. If this ends up as an insurance conversation, a handover claim or a dispute with a previous contractor, the photos taken before drying are the ones that carry weight.
- Do not bleach it and do not heat it. Household bleach cannot sterilise swollen chipboard, and it adds water to a cavity that already has too much. A heat gun or hair dryer on a laminate front will lift the veneer in minutes.
Which leak is it? The Dubai list
Under-sink cabinets fail from below and from above, and the fix depends on which. Work through this. Each test takes a minute.
| Where the water comes from | The tell-tale sign | How to confirm it in a minute |
|---|---|---|
| Sink strainer or waste nut | Damp on the underside of the bowl area, worst after the sink has been filled | Plug the basin, fill to a third, stand back. If it drips with the taps off, it is the waste |
| Tap supply flexi-hose or isolation valve | A wet patch high on the back wall of the cabinet, scale crust around the nut | Dry it, wrap a strip of paper towel around each joint, check after an hour |
| Sink trap or drain pipe | Water running down the pipe and pooling at the back edge, worse when both bowls drain fast | Run both taps hard for 30 seconds, watch the trap with a torch |
| Taps leaking onto the deck then over the edge | Staining and lifting on the top of the carcass, not the base | Feel the top rail of the cabinet inside; water from above collects there first |
| Worktop sink cutout sealant failing | Dark line where the silicone used to be, damp in the door tops below | Press a dry cloth along the cutout inside the bowl, look for water sitting in the channel |
| Dishwasher discharge or a split inlet hose | Damp on the cabinet side nearest the appliance, a musty smell with no visible drip | Pull the appliance out, run one short cycle with the door of the cabinet open |
| Under-sink water filter or RO plant | A slow weep at a quick-connect fitting, a damp blue housing, a filter that has never been changed | Unplug it, shut its inline valve, dry, then watch for 24 hours |
| Fridge ice-maker or water dispenser line | Damp at the back of the cabinet or along the floor to the appliance | Shut the fridge feed valve, empty the dispenser, leave it off a day |
| A leak in the bathroom on the other side of that wall | Damp on the wall behind the cabinet, paint bubbling, no water in the cabinet at all | Look at the wall, not the cabinet. Then check the shower floor and grout |
| AC condensate or a chilled-water pipe overhead | A drip landing on the worktop or in the corner, or a wet patch on the ceiling above the run | Check the tray and the drain line, and whether the pattern grows when the AC is running hard |
That last row is the one people miss, and it is why “it must be the sink” is a dangerous assumption. A cabinet against a wall shared with a bathroom, or under a bulkhead with a condensate line, can be wet for entirely unrelated reasons. If the wall behind the cabinet is damp, this is a building problem with joinery damage, not a joinery problem.
What never comes back, and what does
Here is the honest triage. It is about material and time, not about how bad it looks.
The finger test. Press your thumb firmly on the base panel, the toe kick and the lowest 100 mm of each side. If the surface dents, feels like wet cardboard, or crumbles at a cut edge, that panel is finished. No drying, hardener or paint brings compressed particleboard back.
The 24 to 48 hour rule. A panel that is still firm after a couple of days of airflow has a real chance of staying in service. One that is already swollen or spongy at that point has reached its final shape.
Swelling is permanent in engineered board. Particleboard and standard MDF are chips and fibres glued with a resin that water attacks. Once they have expanded, they dry larger, weaker and no longer holding screws. Sanding a swollen edge does not shrink it, it just removes the laminate until it looks worse.
| What you found | Verdict | What the work involves |
|---|---|---|
| Damp staining, all panels firm, no swelling | Save it | Dry 2 to 4 days, confirm with a meter if you can, clean, re-lay a removable tray or mat, reseal the cutout |
| Laminate lifting at one edge, board underneath still hard | Save it, cosmetic | Dry, trim and re-bond or replace the laminate sheet, edge-seal |
| One base panel swollen or soft, sides sound | Repair in place | Cut out the damaged base, fit a new panel of moisture-resistant board or marine ply on support battens, seal every edge and the perimeter joint |
| Sides or back panel soft, screws no longer bite, the box is out of square | Replace that carcass | New cabinet box in the existing opening, reuse the doors if the laminate is sound, or replace doors to match |
| Swelling across a run, wall behind damp, musty smell that returns | Stop cutting, find the water first | Leak tracing and the wet works, then joinery. Rebuilding over a wet wall repeats the job in a year |
| Mould spreading inside the cavity and on the back of the board | Replace the affected board | Remove, dry the structure, treat the wall, rebuild. Do not board over it |
On moisture readings: if someone brings a pin meter, wood that has returned to roughly 12 per cent moisture content is generally fine to refinish and reassemble. Readings up around 20 per cent mean the core is still wet, and closing it up then traps the problem inside a fresh coat of paint.
What a proper repair actually looks like
If only the base is gone, the good news is that you do not need a new kitchen, and the cabinet does not need to come off the wall or the worktop off the top.
- Remove the sink unit’s contents, doors if needed, and the swollen base panel.
- Let the cavity dry properly, with airflow across the interior, before anything new goes in.
- Fix support battens inside the cabinet sides so the new panel has something to sit on, not just glue.
- Cut a replacement base from marine-grade plywood or a moisture-resistant board, sealed on all faces and edges, not raw MDF or standard chipboard. A metal or HPL pan tray over the top is a worthwhile upgrade, because it turns the next small leak into a wipe-up instead of a rebuild.
- Notch for the waste and pipes, sit the panel on the battens, fix and seal the perimeter with a flexible sealant.
- Reinforce any corner joints whose screws have lost their grip with blocks or brackets.
- Re-hang the doors and set them, because a cabinet that has been wet usually ends up slightly out of square.
Expect one day for a single base panel once the area is dry, plus the drying time on top. Anything that dries in an hour is not dry.
The “fully waterproof aluminium kitchen” question
UAE showroom staff sell aluminium-frame kitchens as waterproof, and you will be asked about this the moment a cabinet has failed. Be specific about what the claim covers.
An aluminium or honeycomb-aluminium carcass genuinely does not swell, does not rot and will not grow mould on the panel itself. That is a real advantage in a kitchen where a leak is likely: under a sink, in a utility room, on a wall shared with a bathroom.
What it does not make waterproof is the rest of the assembly. The door fronts are often MDF or plywood with lacquer or film, and their edges are where swelling starts. The worktop, its sink cutout and the sealant around it still leak onto the top rail. Hinges, runners and fixings corrode in damp air. The wall and floor behind the cabinets get wet whether the carcass is aluminium or not, and that is where the smell and the mould live.
So the sensible reading is this. Aluminium carcasses reduce how much damage a leak does, and they buy you time. They do not remove the need for a working isolation valve, a decent tray, and a yearly look under the sink.
Stop it happening again: nine small things
- Fit or free off the isolation valves under the sink, the dishwasher and the fridge feed. Seized valves mean every small leak turns into draining the whole property, or a burst hose turns into water everywhere until someone finds the stopcock.
- Replace the flexible supply hoses every five years or so, not when they fail. Scale from our hard water eats the braiding from inside.
- Put a leak alarm in the base cabinet. They are cheap, they beep loudly, and a ten-second warning is the difference between drying a mat and rebuilding a run.
- Keep a removable tray or mat in the sink cabinet, and take it out to dry every few months.
- Do not store cardboard, towels or paper in the base of any cabinet.
- Check the silicone at the sink cutout and around the taps once a year. Re-seal it before it fails, not after.
- Service the RO or filter unit, change the cartridges and check the quick-connects. That plant is the quietest leaker in most Dubai kitchens.
- Run the extractor while you cook, and leave the cabinet doors open for an hour after any spill under the sink.
- If the kitchen sits against a bathroom wall, look at that wall from the bathroom side once a year: grout, the shower floor, silicone at the tray. Water travelling in a screed shows up in the driest-looking room first. We cover that journey in water pooling in your shower floor and in why white powder keeps appearing on your marble floor.
When to stop and call someone
Call someone when any of these are true:
- The damp is on the wall behind the cabinet rather than under the sink.
- The smell of mustiness stays after 48 hours of drying, or the neighbours below have a stain.
- Doors or drawers in an adjacent run have started to bind, which means the movement is in the carcass or the floor, not the panel.
- There is rust on the fixing brackets or the screws no longer hold.
- The cabinet was fitted inside the past year, or the leak has damaged a built-in appliance.
- The water is warm, discoloured or has come from a drain rather than a tap. Treat it as contaminated and do not clean it yourself.
Frequently asked questions
Can a swollen kitchen cabinet be repaired?
The swollen panel cannot, but the cabinet often can. Engineered board that has taken on water and expanded does not shrink back to strength. What you replace is the damaged panel, usually the base, and what you keep is the box, the doors and the worktop if they are sound. That is a much smaller job than a refit, and it is the one most people assume they cannot afford.
How long should I dry a wet cabinet before deciding?
Two to four days of airflow in an air-conditioned kitchen, longer if the wall behind is involved. Judge it by feel and by a moisture reading if you have one, not by the surface looking clean. A laminate front can look dry while the board under it is still wet enough to keep working.
Is it cheaper to replace one cabinet or the whole kitchen?
Almost always one cabinet, and a base-panel repair is cheaper again. The reason a whole run gets replaced is usually that nobody checked whether the box is square, or that the leak was still active when the new panels went in. Fix the water, then replace the minimum.
Will my building insurance or the developer cover it?
Sudden and accidental escape of water is commonly covered for the resulting damage, while slow leaks, worn hoses and lack of maintenance usually are not. Your handover maintenance period covers defects in the works, not wear. Read your own policy and handover documents, and photograph the damage before any drying, because that is the evidence any assessment relies on.
Does a water leak under the sink cause mould?
Yes, if it stays damp. A closed cabinet cavity with wet board and food debris is ideal for it. Mould on non-porous surfaces can be cleaned; mould that has grown into chipboard or into the back of a panel means removing the material. Bleach on swollen board solves nothing and adds moisture.
Should I upgrade to an aluminium kitchen after this?
Consider it for the sink base, the utility room and anything against a wet wall. It reduces the damage a leak causes rather than preventing the leak, so pair it with accessible valves, a tray and a leak alarm instead of treating it as a guarantee.
Get the leak found before anything is rebuilt
Send us three photos: inside the cabinet with the doors open, the floor of the cabinet showing the swelling, and the wall behind if it is damp. Tell us which wall the bathroom is on and whether you have an RO unit or a plumbed fridge. We will tell you which of the leaks in the table above it looks like, and whether this is a base panel, a carcass, or a wall that needs the tiler before the carpenter.
We handle the joinery side and coordinate the wet trades: kitchen renovation, carpentry and joinery, and bathroom works. Request an inspection, or see what previous clients say.